These homemade chocolate bars come together as easy as 1-2-3. Just follow the steps below and have fun creating your own delicious combinations.
Valentine’s Day is just around the corner. And I don’t know about you, but I love an easy homemade gift. Not to mention that if the gift involves chocolate I’m pretty sure everyone will love them as much as I do. Believe me when I hear you say, “who wants to take the time to make something homemade?” Gifting homemade items isn’t everyone’s thing. However, this is Valentine’s Day and nothing shows love more than a homemade gift. Food is love!
Over Christmas I gifted homemade cookie boxes to my close friends. The time it took to make the cookies was definitely a labor of love. These homemade chocolate bars are the complete opposite. They’re simple to make and even if you don’t have the molds, you can always make them into a disc or use a cookie cutter and have them turn into a fun shape. Get creative and have fun. When it comes to the toppings, they’re completely customizable. Dried fruit, nuts, pieces of cookies, candy, the sky is the limit. What are your favorite add-in ingredients?
Ingredients: Homemade Chocolate Bars
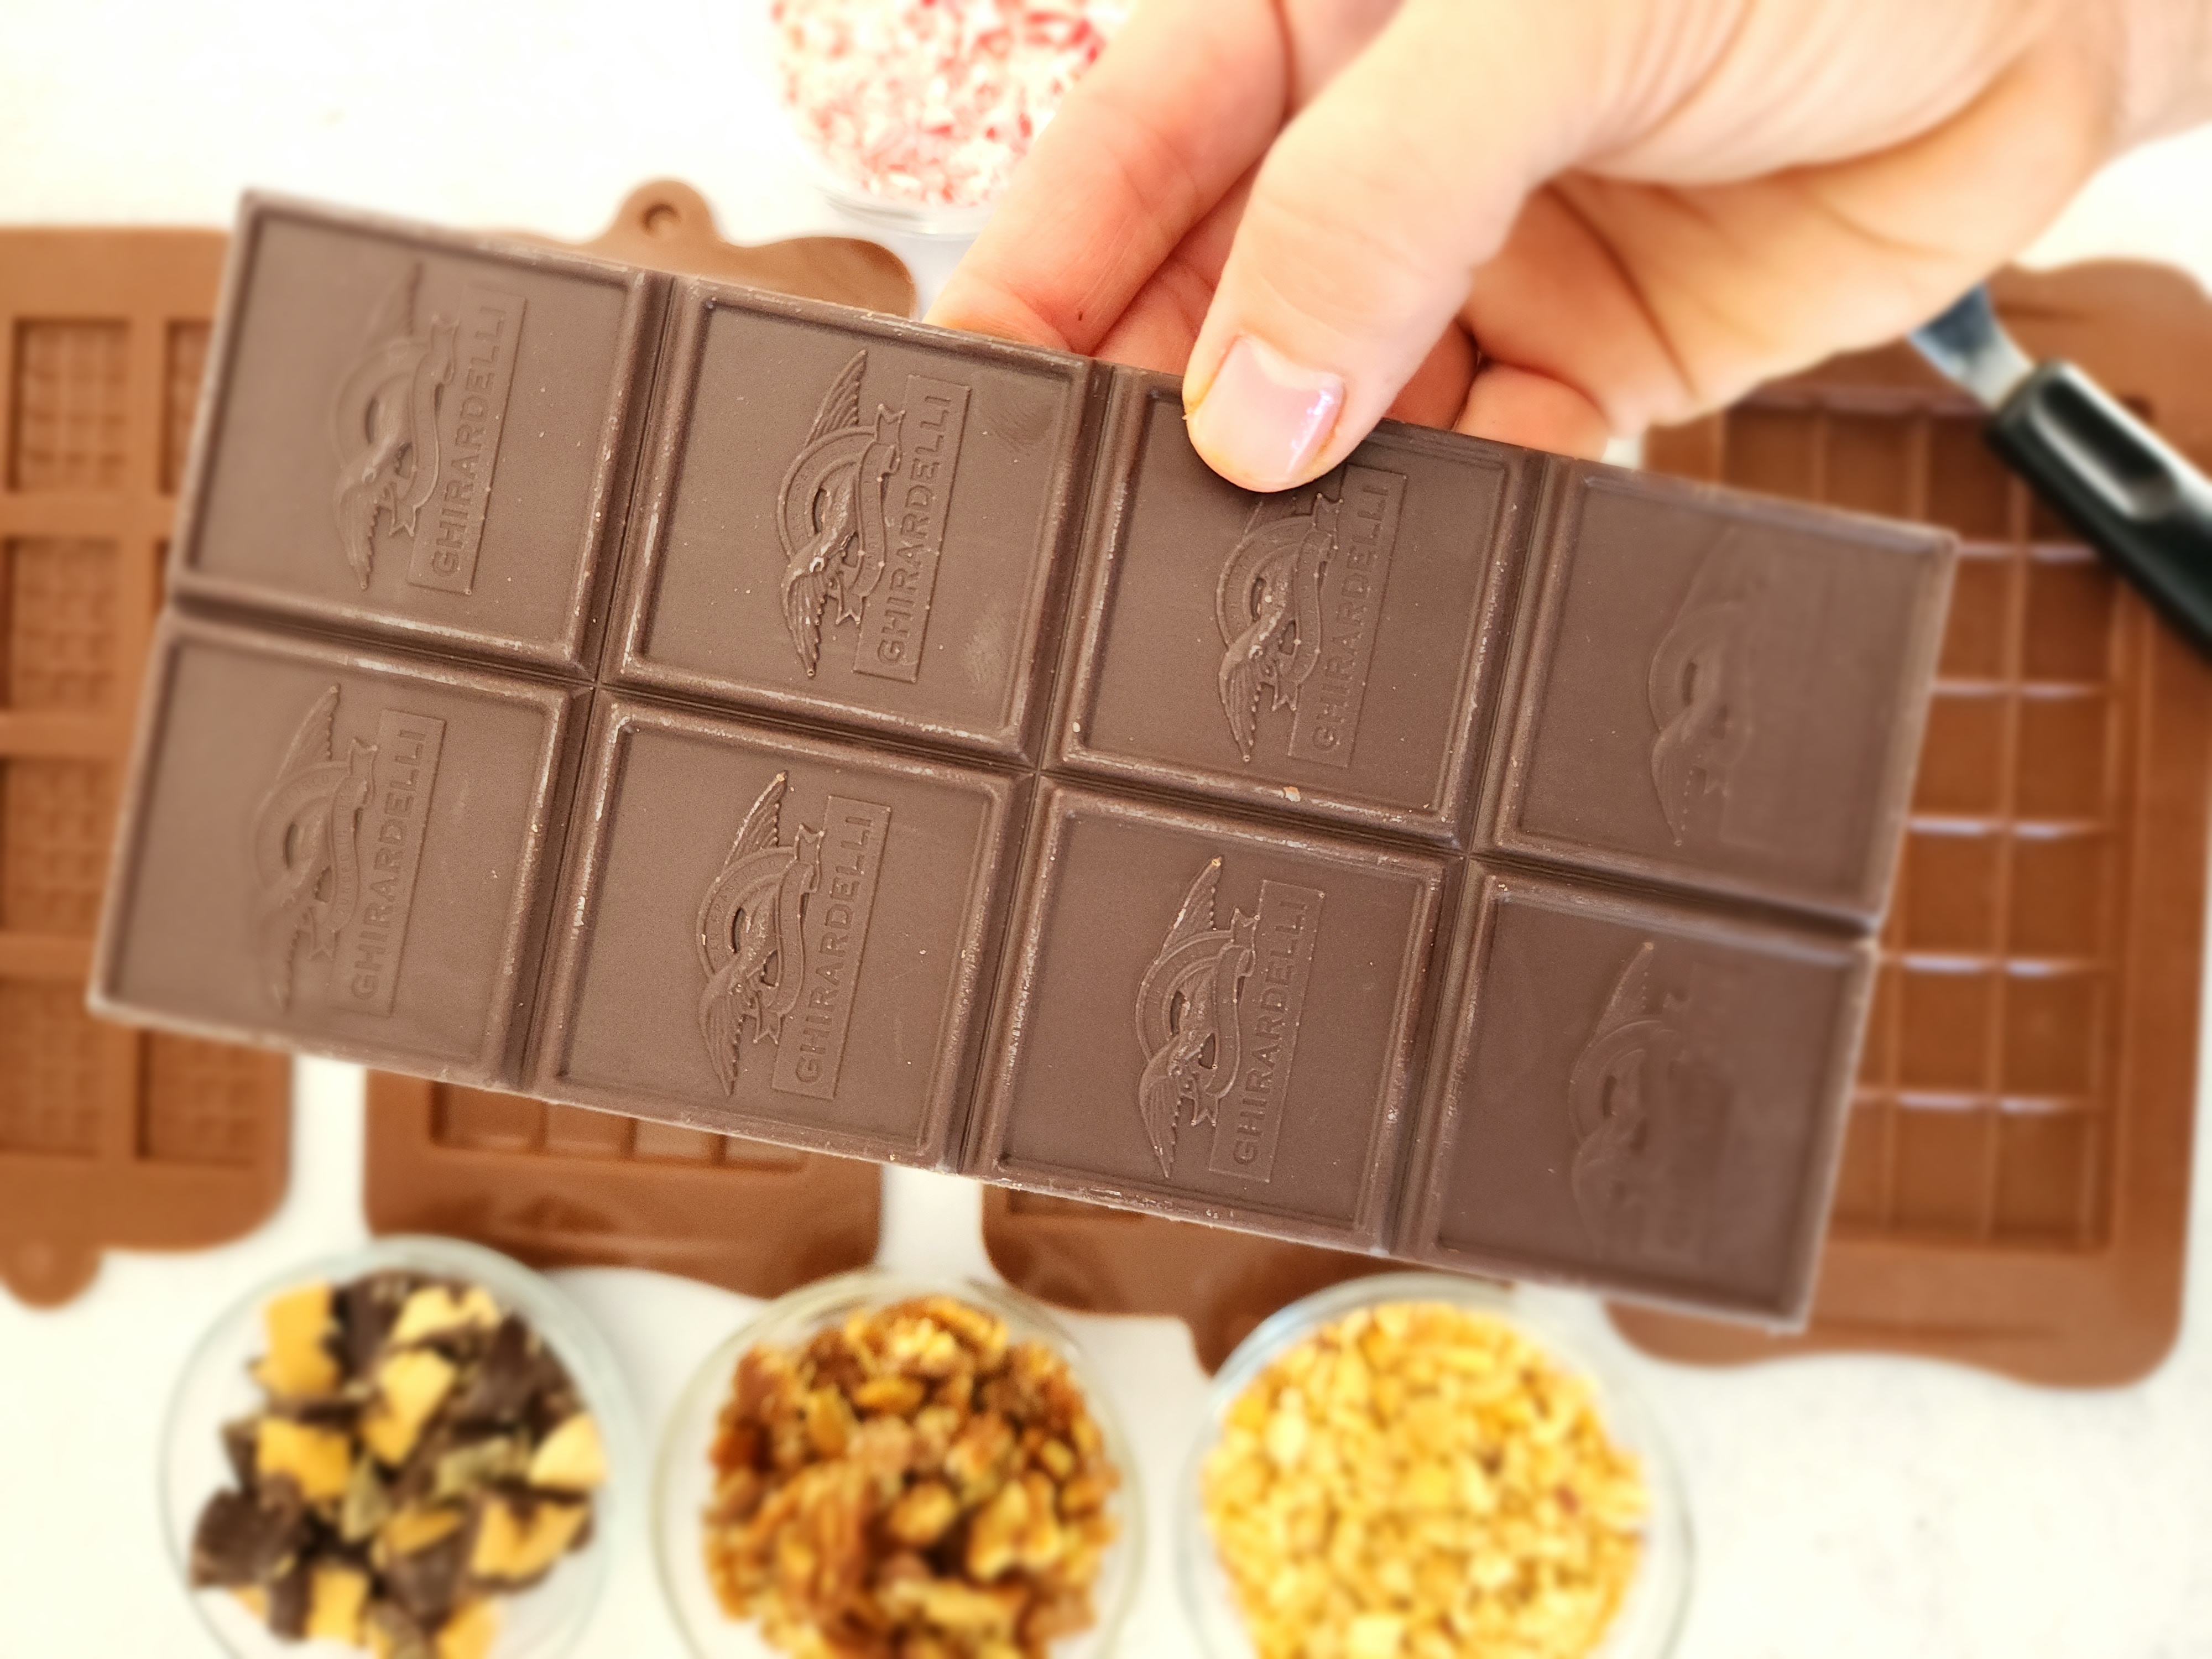
- Chocolate: These homemade chocolate bars can be made with your favorite chocolate: dark, milk or white chocolate. As I always say here on the blog, since there aren’t many ingredients, you do want to make sure to use a high quality chocolate. Chocolate bars are best as the chocolate chips/morsels can often have a coating that isn’t ideal for melting. My go-to and affordable chocolate is Ghirardelli. If I’m really trying to impress I’ll use Guittard or Valhrona.
- Add-ins: This is fun part. Choose your favorite toppings to make these homemade chocolate bars customized. My favorite is the mini peanut butter cup. Other great add-ins include chopped peanuts, peppermint candy, salted caramel, almonds, popped quinoa. Really the possibilities are endless. Simply pick your favorites (or who you’re gifting to) and mix and match.
- A mold/cookie cutter: Normally a minimalist, when it comes to the kitchen I tend to buy items that aren’t really necessary. If you don’t want to invest in these chocolate molds, as I mentioned before, simply make small chocolate discs as I did here. Using a cookie cutter is more tedious, however, it made a beautiful heart shape, and well Valentine’s Day (am I right?!). The key is once the chocolate sets you don’t want it to break, so silicone works best. I love the chocolate discs I did a few years back, they’re really a perfect size!
How To Make Homemade Chocolate Bars
- Gather your toppings: Whatever toppings/add-ins you’re going to use, grab them first. If some need to be cut into smaller pieces, do that now as well. As soon as you pour your chocolate you’re going to want to make sure to have the add-ins ready to go!
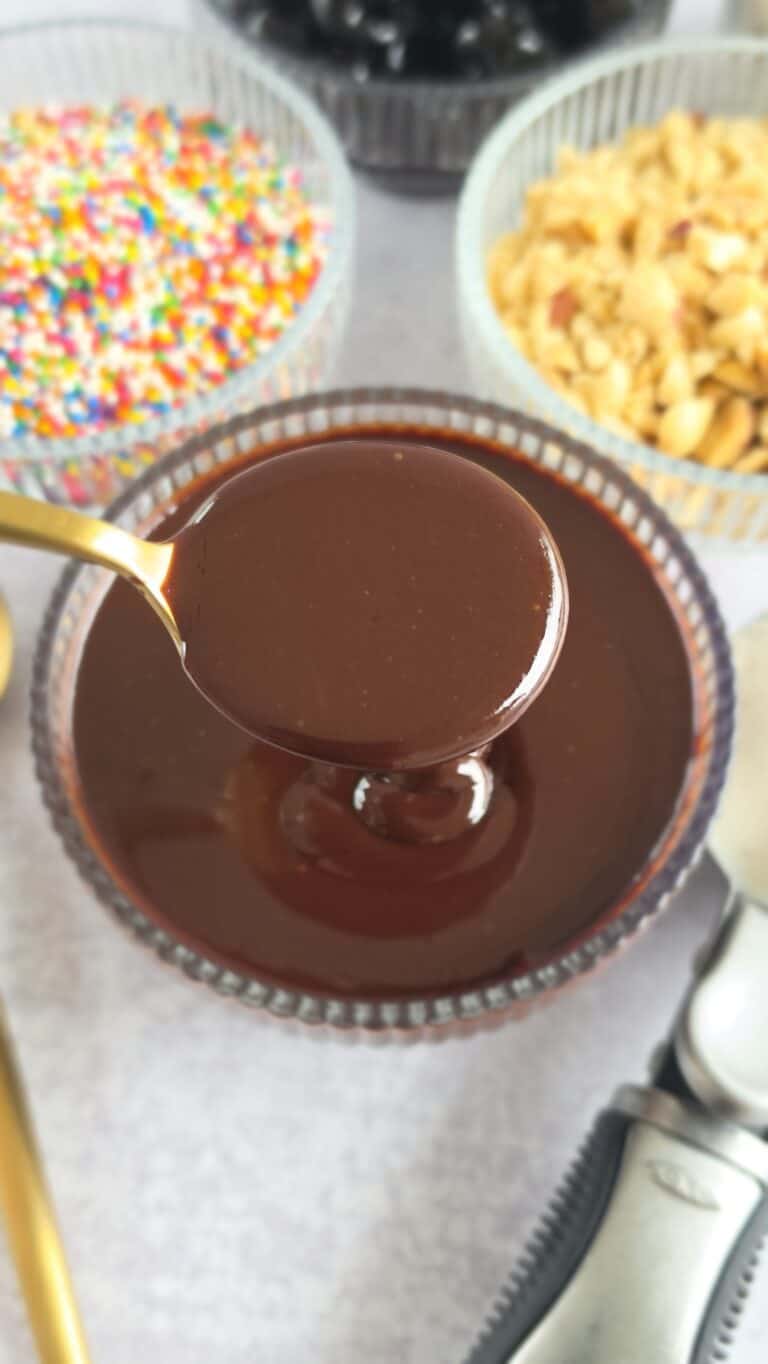
- Melt the chocolate. Set up a double boiler over medium low heat. Bring your water to a simmer in a pot and then set a bowl above. Make sure the bowl above is not touching the water. Add the chocolate and stir often until smooth and shiny. Remove from the heat and keep the bowl over the pot of hot water to help prevent the chocolate from setting as you begin to work. You can temper your chocolate, simply follow the directions here. I’m lazy and don’t often temper the chocolate. Untempered chocolate will melt at room temperature. Here in Miami I always keep the chocolate in the fridge since the temperature is always warm!
- Pour Chocolate into Molds: Once the chocolate is fully melted and smooth, use a spoon or measuring cup to pour the chocolate into clean, dry silicone molds. I set the chocolate molds on a cookie sheet, so they’d be ready to go straight to the refrigerator. Fill only to the top line of the mold and use an offset spatula to smooth the tops. If you choose to make the chocolate discs, I used a spoon to simply dollop a tablespoon of chocolate and it stayed a perfect circle. You’d only have to make sure to have your add-in items a smaller size to ensure they fit on top.
- Add Toppings and Chill: This is where the fun starts! Add any toppings you like to the melted chocolate before it sets! I used just a tablespoon or so. Choose your own combinations, get creative, and aim to create your own signature homemade chocolate bars (or discs)!
- Remove Bars From Mold: Once the toppings have been added, place the cookie sheet in the refrigerator to set for at least 20 minutes. If the chocolate is still soft to the touch, chill for a few more minutes. Remove the bars from the fridge and gently peel the molds away from the chocolate. Since the mold are silicone, they should separate easily. Eat and enjoy! or wrap for your friends!
These homemade chocolate bars are the perfect Valentine’s Day gift for your loved one. They are easy to make and delicious to eat!
Other Homemade Gifts
Print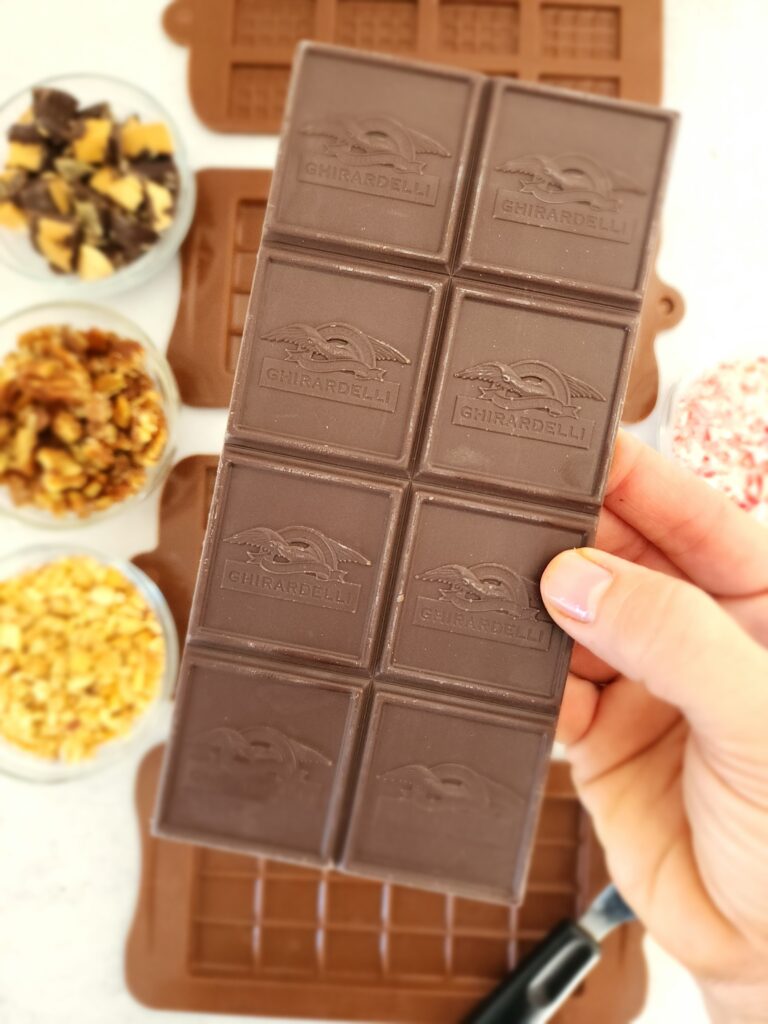
Homemade Chocolate Bars
These homemade chocolate bars come together as easy as 1-2-3. Just follow the steps below and have fun creating your own delicious combinations.
- Total Time: 10 minutes
- Yield: 4 1x
Ingredients
- 4 ounces chocolate of choice
- 1 tablespoon topping of choice
Instructions
- Gather your toppings: Whatever toppings/add-ins you’re going to use, grab them first. If some need to be cut into smaller pieces, do that now as well. As soon as you pour your chocolate you’re going to want to make sure to have the add-ins ready to go!
- Melt the chocolate. Set up a double boiler over medium low heat. Bring your water to a simmer in a pot and then set a bowl above. Make sure the bowl above is not touching the water. Add the chocolate and stir often until smooth and shiny. Remove from the heat and keep the bowl over the pot of hot water to help prevent the chocolate from setting as you begin to work. You can temper your chocolate, simply follow the directions here. I’m lazy and don’t often temper the chocolate. Untempered chocolate will melt at room temperature. Here in Miami I always keep the chocolate in the fridge since the temperature is always warm!
- Pour Chocolate into Molds: Once the chocolate is fully melted and smooth, use a spoon or measuring cup to pour the chocolate into clean, dry silicone molds. I set the chocolate molds on a cookie sheet, so they’d be ready to go straight to the refrigerator. Fill only to the top line of the mold and use an offset spatula to smooth the tops. If you choose to make the chocolate discs, I used a spoon to simply dollop a tablespoon of chocolate and it stayed a perfect circle. You’d only have to make sure to have your add-in items a smaller size to ensure they fit on top.
- Add Toppings and Chill: This is where the fun starts! Add any toppings you like to the melted chocolate before it sets! I used just a tablespoon or so. Choose your own combinations, get creative, and aim to create your own signature homemade chocolate bars (or discs)!
- Remove Bars From Mold: Once the toppings have been added, place the cookie sheet in the refrigerator to set for at least 20 minutes. If the chocolate is still soft to the touch, chill for a few more minutes. Remove the bars from the fridge and gently peel the molds away from the chocolate. Since the mold are silicone, they should separate easily. Eat and enjoy! or wrap for your friends!
- Prep Time: 5
- Cook Time: 5
- Category: Desserts


1 thought on “Homemade Chocolate Bars”
SO creative! Love the idea of a homemade gift. & with chocolate? Even better!